
January Drawing Ideas Plan
Daily Drawing Exercises

Drawing exercises for beginners and intermediates to aid in getting a daily routine.

Draw Simple Shapes
Simple shapes and forms are found everywhere in your own home. Just fill a sketchbook page with some of the most basic forms.
All you need to remember is using line contour variations as you have learned in class, representing lines that vary in thickness and value. The darkest areas are corners and where changes in direction of a contour line occurs. |
Reference: Pencil Drawing Techniques by David Lewis, Watson-Guptill Publications
|
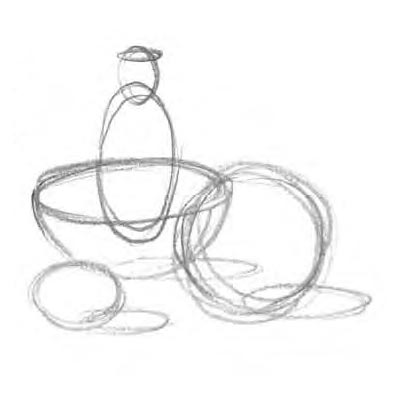
Draw Circles and Ovals
Circular strokes are an important way of describing forms.
Begin to draw circles by locking in your wrist and draw from the shoulder and your whole arm. Draw small and larger ones all over the place. Once warmed up, create a still life with form and draw all shapes, even cylinders or rectangles as circles or ovals. |
|
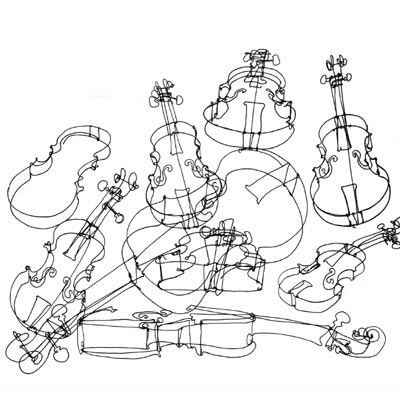
Draw Lines Like a Wire
This exercise is for the purpose to let you free of precision. The goal is to detach from the usual goal of being precise, which when used as the only means of drawing will stiffen your creativity and work.
Find an interesting subject and draw it in one line without ever lifting the pencil from the page until one form is complete. It is challenging as it is refreshing. |
|
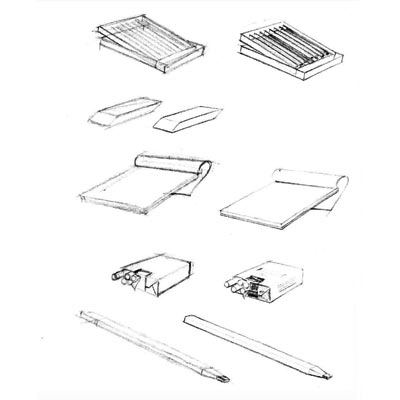
Draw Light On Simple Forms
Today we are looking for simple forms around the house and concentrate on only two to three value tones only. Just light and dark with a little hint of some mid tones. That's it.
Anything from stones, flowers, a piece of wood will do. Use a few concave and convex forms, such as an egg or a bowl. |
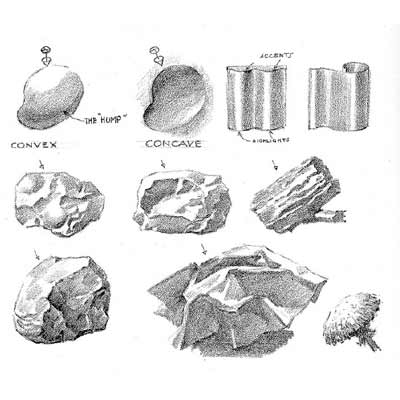
Image Reference: Andrew Loomis: Successful Drawing
|
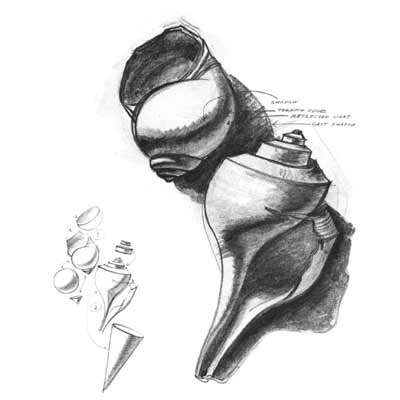
Drawing A Shell
Start warming up with a few basic geometric forms that comprise the structure of the shell, as seen on the left bottom side of the image.
Then concentrate on one or two shells. You can use the image provided, but if you have any shells at home, use them. |
|
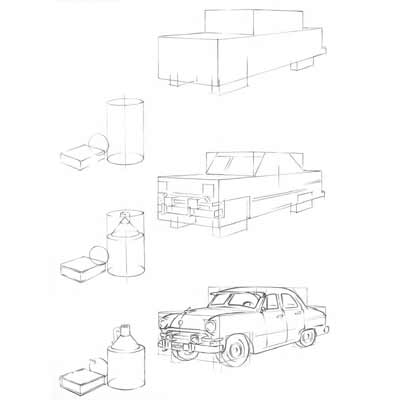
Draw a Car
The best way of drawing a car is to imagine that the car is set inside of a box. By drawing boxes first, your car automatically adjusts into a correct perspective.
Warm up with a small cylinder drawing as seen on the example. |
|
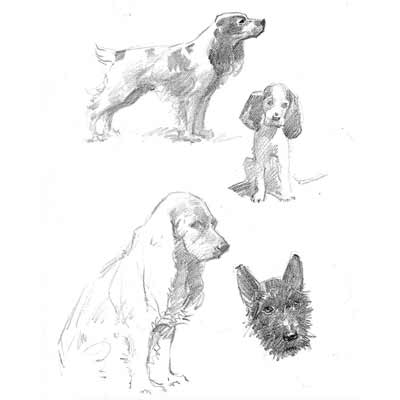
Draw a Dog
When drawing one of our furry friends, it is very important that you get the overall shapes first. Instead of drawing every single hair of the fur, simplify by drawing shaded areas with broad hatching as seen on the right.
The goal is to get the main features without too much detail and rather draw a couple of dogs instead. |
|
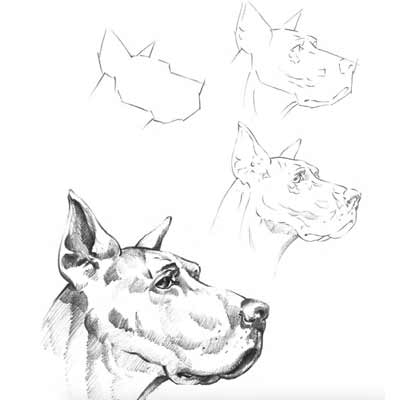
Draw a Dog Portrait
When drawing the base outlines, do this rather with straight instead of curved lines first. You can later round them up.
Like yesterday do your shading with line hatching. You may even want to warm up first with some hatching on a separate piece of paper. Remember that hatching can look extremely confusing if each stroke is not placed neatly and evenly spaced to one another. The all should be placed parallel to each another. For my students, if you have problems, do some warm-up exercises in class this week. |
|
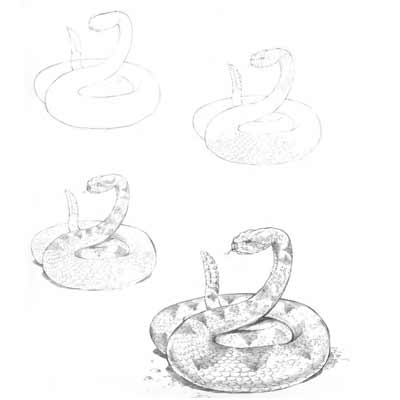
Draw a Snake
Some of you may find this not the sweetest subject to draw, but it is a good exercise.
Begin with the outlines as usual and then draw in some areas the pattern of scales. Leave some parts out, so not to overwork this simple drawing. Then add the triangular shading on top of your scales. Add the eyes and some details on the famous rattle of this particular snake. |
|
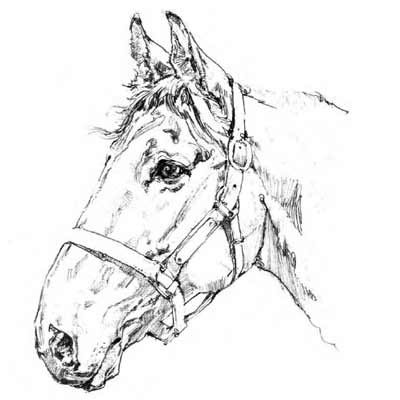
Draw the Head of a Horse
We are still concentrating on outlines with contour variations and add only a little information in regards to shading in the form of hatching. Just to repeat, line contours, the outlines of an object should vary in thickness and tonal value, to avoid that a drawing looks too stiff.
Simplify is the motto for this drawing. |
|
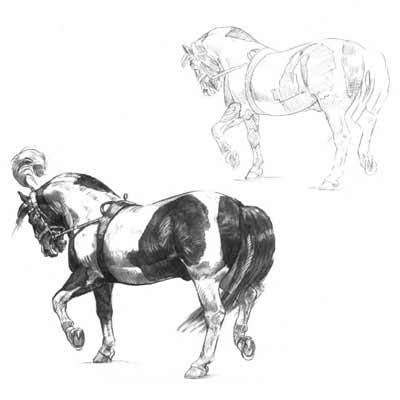
Draw a HorseToday we draw the complete horse. Outline the contours of the horse and then add all mid tones.
Last you add the darker areas. I would suggest that you use a HB pencil for the initial outlines, a 2H for the mid tones and a 2B for the dark areas, with some fewer details even darker with a 6B pencil. The darker the pencil the more it is important that it is sharp to avoid roughness instead of creating beautiful glossy fur. |
|
Draw a Rhinoceros
Once again, the goal is to get the overall proportions right by starting off with a fine line contour which then be thickened in certain areas once you are happy with the proportions.
Add very few shading details and only with some hatching. |

|
Draw a Bearded Iris
Outline Iris with rather straight lines instead of round, this simplifies to see directions of shapes.
Use a 2H to start fine outlines and continue to draw all mid tones or lighter sections with the same pencil. Add darker areas with a 2B or darker, but be sparingly. The pedals of a flower are very soft almost silky, so avoid any roughness by keeping your pencils very sharp at all times. |
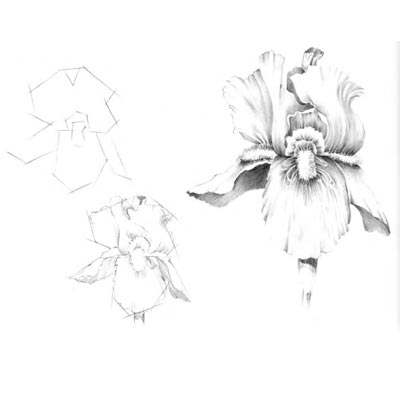
William F. Powell - The Art of Basic Drawing
|
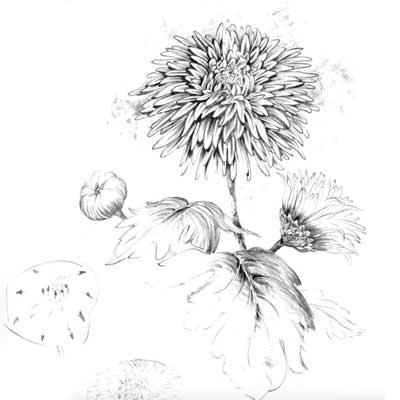
Draw a Chrysanthemum
Today is a bit tougher, as the Chrysanthemum has a lot, I mean a lot of pedals. So the first thing you need to do is drawing a circle where you see the pedals falling inwards rather than outwards. Then look for outlines, that is where a row of pedals are ending either in a line or a curved line.
Always start with the larges pedals first, that counts for any flowers you might draw. |
|
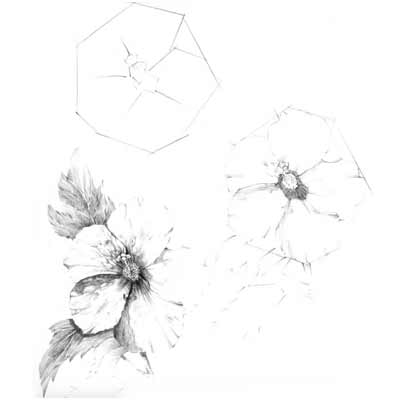
Draw a Hibiscus
First, outline the five major pedals of the Hibiscus plant by using straight lines to depict the angles.
Then add details for the darker areas with a 2B or darker and 2H or lighter for all mid-tones. Don't forget to leave a lot of white areas, so that your drawing ranges in contrast from complete black, through mid-tones to absolute light. |
|
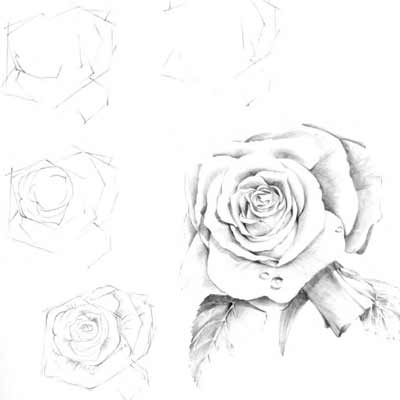
Draw a Rose
With a 2H pencil draw lightly the outlines of the rose by using straight lines instead of curved to make it easier for you to see angles clearer.
It is important that you begin with the larger pedals first as this takes much of the confusion we often feel when we confront too many details. The left side of the brain wants to shut down. So you have to slow your brain right down, breath deeply and concentrate on the larger areas first. You will see that in the end, the details weren't too bad at all. |
|
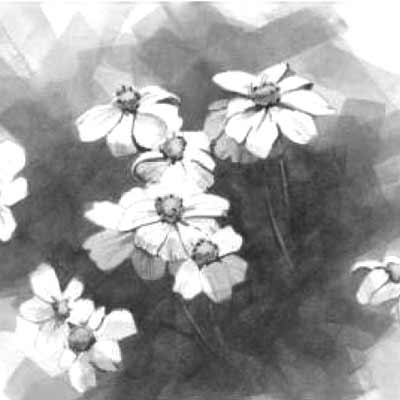
Draw from Dark to Light
Today we use a completely different method and draw from dark to light. First, cover the whole area with a 2H in all lighter areas, a HB for all mid-tones and a 4B for all darker sections. You must take caution not to press the paper tooth too harsh, the graphite needs to be applied only lightly. You can use a small harder brush or paper stump to blend the areas well.
Then use your putty eraser to take out all lighter areas representing pedals, while leaving the darker inner parts of the flower. Then use a normal or electric eraser to clean up hard edges. Leave some edges softer than others for interest. |
|
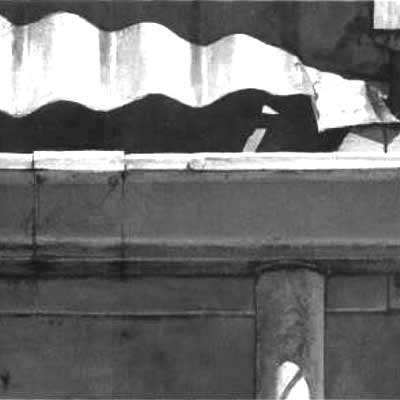
Draw from Dark to Light
Once more we work from dark to light. Like yesterday, cover the whole image with the value of the main wall. Use the putty eraser to take out all lighter sections. Sharpen edges with a normal eraser and add the darkest areas by using a sharp 4B pencil.
To soften the mid tones and dark components you are allowed to use a paper stump or harder smaller brush for this task to smooth things down at the end, but leave the lighter areas alone and draw them by hand with a lighter 4H pencil. |
|
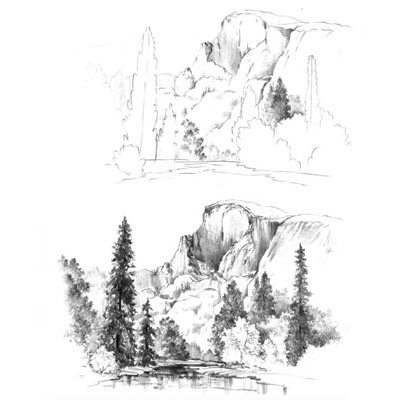
Draw a Mountain
We bring some nature into our theme this week as we dwell into rock formations and landscapes.
Begin as usual with the light 2h pencil to create outlines of forms. Continue with darker areas on the top of the mountain with a HB or 2B and then move to the trees in front. The last details should be added within the lighter parts of the mountain with a 4H or 2H. Remember the rule is to start with the dark first, as we otherwise tend to overwork light sections by far too easily. |
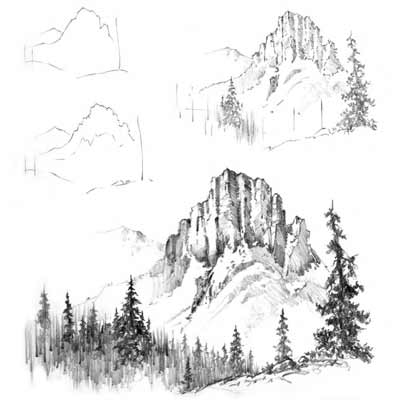
Image Reference: William F. Powell, The Art of Basic Drawing
|
Draw a Sycamore Tree
Draw the outlines with a 2H lightly, than add the darker sections within the tree with a HB and in the darkest areas a 4B.
Use circular motion for all trees and bushes. |
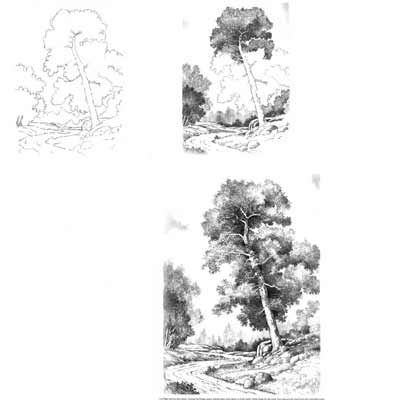
William F. Powell - The Art of Basic Drawing
|
Draw a Cherry
Today we are going to draw a cherry with a glossy surface. The aim is to catch detail. You may even put some water drops onto the cherry for interest.
Create outlines with a 2H pencil by trying to establish straight lines rather than round. The only way you can get a very smooth surface is by using harder pencils between 6H and 2H and having the pencil very sharp at all times. Study all light and dark's very carefully, by that I mean not to forget even small white lines that highlight certain sections. |
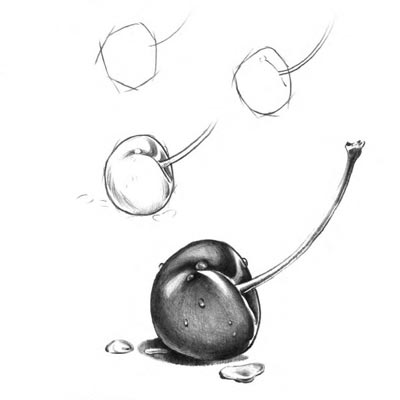
Image Source: William Powell, The Art of Basic Drawing
|
Draw Fruit
With a 2H pencil capture the basic form of the fruit. Once again use straight lines to catch the base forms, as most fruit is not round at all. For the pear though you can see that it is made of two overlapping circles. So study your fruit to determine which approach is better.
Add shading by using mostly a 2H or even 4H pencil. For the darker outlines use a 4B, but only by applying line contour variations. |
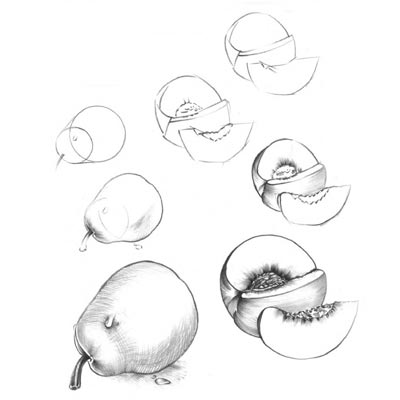
William F. Powell, The Art of Basic Drawing
|
Draw a Strawberry
Oh no not again! Yes another fruit folks. Practice makes perfect.
Outline the fruit with straight lines and round them up with a 2H pencil. Study if the dots of the strawberry have a sort of pattern or are all just random. To make it easier you can use an embossing tool to impress small dots for the pores. Watch out for those darker outlines surrounding the white pores which are darker on one side and lighter on the other. Then add shading with pencils from 4H to 2H. |
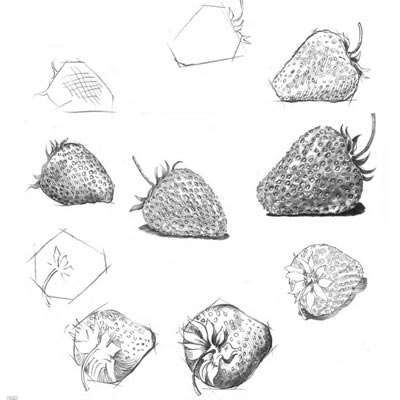
William F. Powell, The Art of Basic Drawing
|
Draw Rocks 1
Draw a small rock formation by outlining the planes of each rock with a 2H pencil. Vary between round and straight lines. Rocks can be very contrast rich, so make sure you use the whole range of tonal values for its 3 dimensional effect.
Add some grass or small bushes to soften the image. |
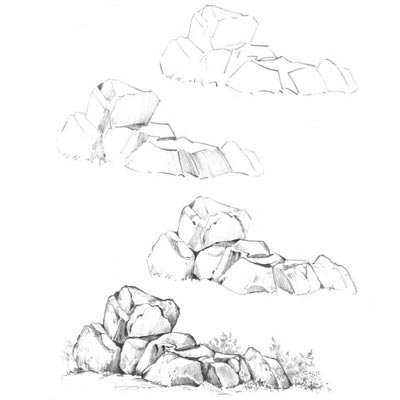
William F. Powell, The Art of Basic Drawing
|
Draw Rocks 2
And ones more to deepen your knowledge of rocks. Use the same method of the previous day.
You are allowed to use different types of pencils or pens, such as using a ball pen or pure graphite pencil instead. |
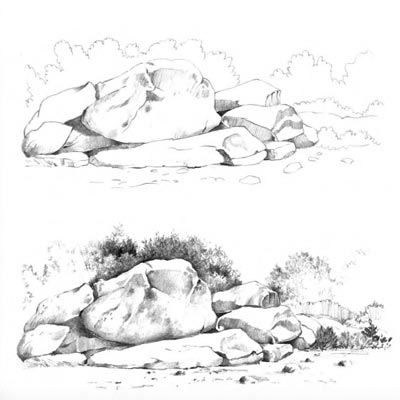
William F. Powell, The Art of Basic Drawing
|
Draw a Landscape
Today we will combine what we have drawn in the last two days and add some more features such as still water and trees.
After you have drawn the outlines and added all tonal values and details, re-check if the focal point, the trees in the front and parts of the water, are in fact have the darkest value compared to the rest of the image. |
Willam F. Powell, The Art of Basic Drawing
|
Draw a desert
This will be our last rock formation landscape drawing for some time.
Use the same approach as we did in the last days. Once you have applied all details, re-check that the shadow area of the front rock formation is altogether darker. Remember how we run a little wild with tonal value because of all the detail. At the end we have to simplify the overall tonal value of a particular area. And the right hand side of the rock formation in the front is all in all much darker than the left side. Without this difference the 3 dimensional effect is lost |
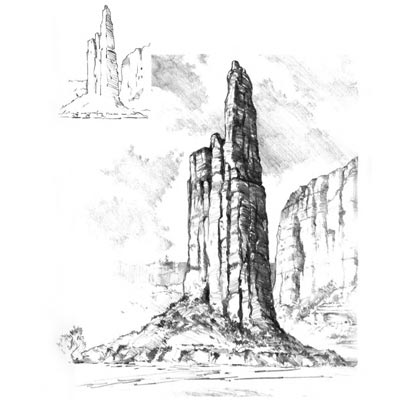
William F. Powell, The Art of Basic Drawing
|
Our Services |
|